The Netgear DG824M is Netgear's latest baby in the ADSL modem market place (May 2003). It is readily recognisable as a member of the current Netgear family from the sleek silver case that is used across several members of the Netgear range. The DG824M builds on the popularity of the DG814 by adding an 802.11b wireless access point, stateful packet inspecting firewall, intrusion detection logging and denial of service protection. These new features do not compromise the ease of set-up that was the hallmark of the DG814
The package contains the usual selection of parts namely the power supply brick (15V 1Amp), RJ-45 network patch cable (3m), RJ-11 lead (3m), wireless antenna, an Excelsus Z-420UK-A microfilter (the A designation denotes a newer model that is a higher in specification than previous Excelsus filters, and should support caller ID devices), 3 year warranty card, 24x7 support phone number card (020 7 - London number), short four page quick set-up guide and finally a resource CD, containing the full manual.

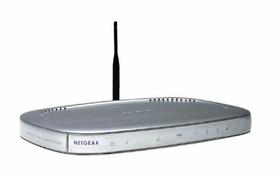
The rear of the router provides all the connection points for the router. Running from left to right: power input socket, wireless antenna socket, recessed reset switch, 4 x RJ-45 Ethernet ports, and the RJ-11 ADSL socket. The front of the router has eight different LED's for the flashing light addicts, again going from left to right these are: power LED, test/diagnostics indicator, Internet activity, wireless activity, finally the four numbered LED's show which Ethernet ports are active and whether they are running at 10Mbps or 100Mbps. The various activity LED's flash off/on to indicate activity. For people wanting to monitor the throughput from the router, a simple page showing the LAN and WAN throughput is available via the web interface.

Configuration
Configuring the DG824M is a walk in the park, and is about as simple as it can be made. The quick set-up guide does assume you have your computer's network card already installed and expecting to obtain its IP address from a DHCP server. If this is the case, the process simply involves connecting all the leads as shown in the set-up guide and then switching on the router.

The ADSL activity LED will change to solid green once the ADSL link has established. Assuming the ADSL line successfully synchronises, it is a case of opening a copy of a web browser on your computer and navigating to http://192.168.0.1 (the URL for the web based configuration pages built into the DG824M). The browser will ask for a username and password for the router, the defaults areadmin and password respectively. If you do not see the page shown below then consult the Troubleshooting section of the manual on the resource CD.
DownLoad
Aucun commentaire:
Enregistrer un commentaire